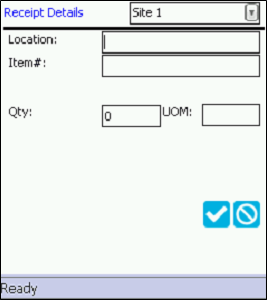
Receipt Details
When you add an item to the stock receipt order from the Receipt Details form, you are returned to the Receipt form\Details tab after the item is added.
How to Add an Item to the Receipt Order
The steps below show how to add an item to the receipt from the Receipt Details form, in full. To see information about the Rapid Receipt form, see "Rapid Issue Details"; to see information about the Mobile Drop Down Lists feature with receipts, see "Receiving with Mobile Drop Down Lists Feature".
- Site: The default site of the logged-in user is automatically placed in this field. If you would like to receive the item to another site, click the drop-down arrow in the Site field and select the site where the item is being received.
- Location: Enter the location where the item is being received.
- Item#: Enter the item number (entering the alternate item number will also display the item number) that is being received in this field.
- Lot, Serial Number, Expiration Date: When you select an item that requires a lot, serial number, or expiration date, you must enter this information for the item. For more information about entering the serial numbers for an item, see "Serialized Items".
- RFID Tag Number: When you select an item that uses RFID this item will accept an RFID tag number; see "RFID Item in Mobile App".
- Item Description: If the item that is being received contains a description, the item's description appears underneath the Item# field.
- Qty and Unit of Measure: enter the amount of the item being received and its unit of measure.
- If using the default receipt quantity orders preference setting, the default quantity will automatically be entered in this field; see "User Preferences" for more information.
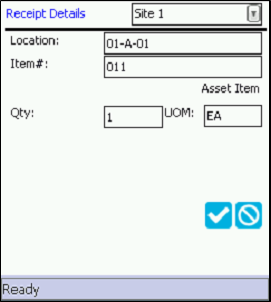
- Click the
 Save icon to close the Receipt Details form and save the record to the order. You are returned to the Receipt form\Details tab. (If you want to cancel this receipt line item, select the
  Cancel icon to close the Receipt Details form and discard this item receipt.)
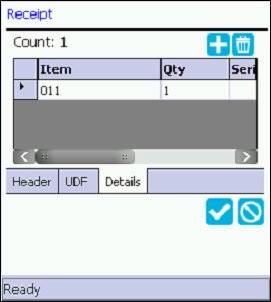
- To add another record to the order, click the
 Add icon and repeat steps 1-6.
 - Continue adding records to the order in this manner until you are finished.
- When you are finished adding items to the receipt, tap the Save icon at the Receipt form\Details tab to receive the items and close the order.